> ## Documentation Index
> Fetch the complete documentation index at: https://www.propeldata.com/llms.txt
> Use this file to discover all available pages before exploring further.
# Kafka setup guide
> Ingesting Kafka messages into Propel.
This guide covers how to:
1. [Create a user in your Kafka cluster](#1-create-a-user-in-your-kafka-cluster)
2. [Make sure your Kafka cluster is accessible from Propel IPs](#2-make-sure-your-kafka-cluster-is-accessible-from-propel-ips)
3. [Create a Kafka Data Pool in Propel](#3-create-a-kafka-data-pool)
## Requirements
* A [Propel account](https://console.propeldata.com/get-started).
* A Kafka cluster with the topics to ingest.
* Access to create users and grant permissions in your Kafka cluster.
***
## 1. Create a user in your Kafka cluster
First, you'll need to create a user with the necessary permissions for Propel to connect to your Kafka cluster.
Kafka doesn't manage users directly; it relies on the underlying authentication system. So if you're using SASL/PLAIN for authentication, you would add the user to the JAAS configuration file.
1. Open the JAAS configuration file (e.g., `kafka_server_jaas.conf`) in a text editor.
2. Add the following entry to create the user "propel" with the password:
```java theme={"system"}
KafkaServer {
org.apache.kafka.common.security.plain.PlainLoginModule required
username="propel"
password="YOUR_SUPER_SECURE_PASSWORD"
user_propel="YOUR_SUPER_SECURE_PASSWORD";
};
```
Replace `YOUR_SUPER_SECURE_PASSWORD` with a secure password.
3. Save the file.
Set the `KAFKA_OPTS` environment variable to point to your JAAS config file:
```shell theme={"system"}
export KAFKA_OPTS="-Djava.security.auth.login.config=/path/to/your/kafka_server_jaas.conf"
```
Restart the Kafka server for the changes to take effect.
Now, you'll use Kafka's Access Control Lists (ACLs) to grant permissions to the "propel" user.
Use the `kafka-acls` CLI to add ACLs for the "propel" user so that it can operate on the `propel-*` consumer groups.
```bash theme={"system"}
bin/kafka-acls.sh \
--authorizer-properties zookeeper.connect=localhost:2181 \
--add \
--allow-principal 'User:propel' \
--operation Describe \
--operation Read \
--operation Delete \
--group 'propel-' --resource-pattern-type prefixed
```
For each topic you need to ingest to Propel, run the following command:
```bash theme={"system"}
bin/kafka-acls.sh \
--authorizer-properties zookeeper.connect=localhost:2181 \
--add \
--allow-principal 'User:propel' \
--operation Describe \
--operation Read \
--topic 'YOUR_TOPIC'
```
Make sure to replace `localhost:2181` with your Zookeeper server.
These commands grant `Describe` and `Read` access to the topics for the user "propel".
Verify that the ACLs have been correctly set by listing the ACLs for the topics you authorized.
```shell theme={"system"}
bin/kafka-acls.sh \
--authorizer-properties zookeeper.connect=localhost:2181 \
--list \
--topic YOUR_TOPIC
```
You should see the ACLs you added for the user "propel".
These instructions set up a API Key and secret with `READ` and `DESCRIBE` permissions in Confluent Cloud.
In Confluent Cloud, you generally use API keys for authentication rather than user/password combinations.
1. Log into your [Confluent Cloud](https://confluent.cloud/home) account.
2. Go to the **"Environments"** section in the sidebar and click on your environment.
3. Click on the **"Clusters"** tab and select your cluster.
4. Click on **"API Keys"** and then on **"Create key**".
5. Choose the **"Service account"**, then **"Create new one"** and name it **"Propel**".
6. In the **"Add ACLs to service account"** section, assign:
* `DESCRIBE` and `READ` operations to the topic you need to ingest to Propel.
* `DESCRIBE`, `READ` and `DELETE` operations to the consumer group `propel-*`.
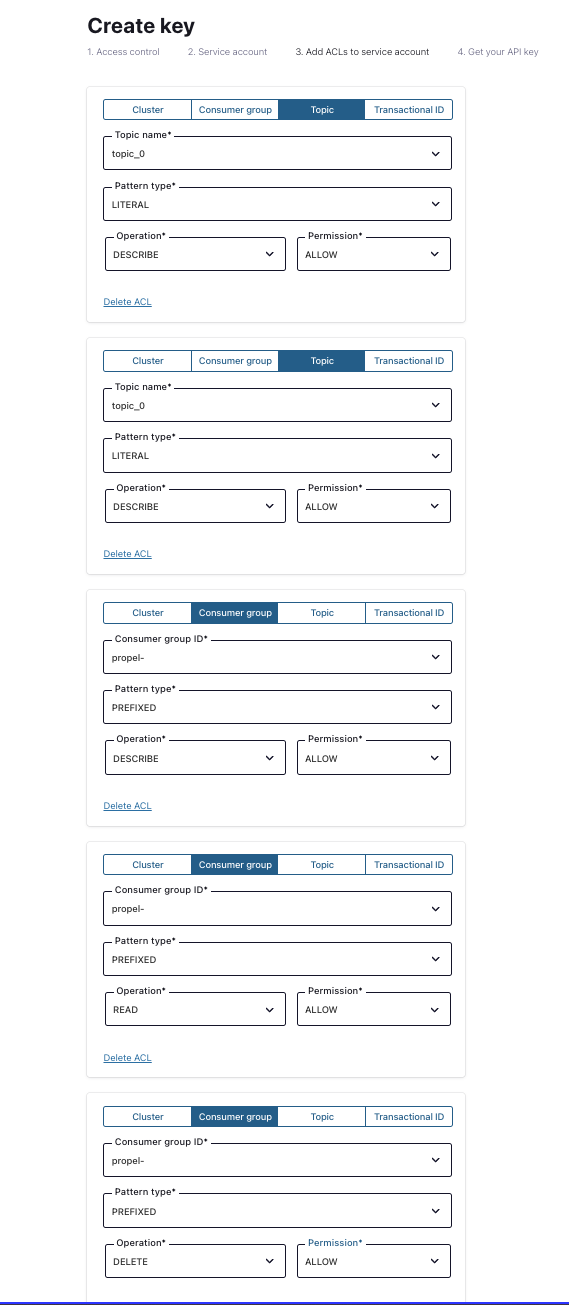 7. Click **"Next"** and get your Key and Secret that you will use as a user and password to connect to your Kafka cluster.
After setting the permissions, you can verify them by clicking on the API key in the **"API Keys"** section and reviewing the roles and resources it has access to.
These instructions set up an IAM user with `READ` and `DESCRIBE` permissions in AWS MSK.
1. Sign in to the [AWS IAM Management Console](https://console.aws.amazon.com/iam/).
2. In the navigation pane, choose **"Users"** and then choose **"Create User**".
3. For **"Username"**, enter "propel" and click **"Next**".
4. Select **"Attach policies directly"**, search and select the `AmazonMSKReadOnlyAccess` policy, and click **"Next**".
5. Then, create a custom policy that grants describe, read, and delete permissions on MSK consumer groups prefixed with "propel-":
1. Click **"Create policy"**, then choose the JSON tab.
2. Paste the following JSON policy into the editor:
```json theme={"system"}
{
"Version": "2012-10-17",
"Statement": [
{
"Effect": "Allow",
"Action": [
"kafka-cluster:DescribeGroup",
"kafka-cluster:DeleteGroup",
"kafka-cluster:ReadGroup"
],
"Resource": "arn:aws:kafka:::group//propel-*"
}
]
}
```
3. Replace ``, ``, and `` with your actual AWS region, account ID, and MSK cluster name.
4. Click **"Review policy"**, give your policy a name (e.g., "PropelMSKPolicy"), and click **"Create policy**".
1. Click on the user "propel" you just created.
2. Click on the **"Security credentials"** tab and click on **"Create access key**".
3. Select **"Other"** and click **"Next**".
4. Enter any tags and click **"Create access key"** (optional: add metadata to the user by attaching tags as key-value pairs).
5. You now have the access key and secret you can use as user and password to connect to your Kafka cluster. Save these credentials securely, as you will not have access to the secret access key again after this step.
Follow these steps to enable SASL/SCRAM for authentication with Redpanda.
1. Edit the Redpanda configuration file (usually located at `/etc/redpanda/redpanda.yaml`).
2. Enable SASL/SCRAM by adding or updating the following configuration:
```yaml theme={"system"}
redpanda:
kafka_api:
- address: 0.0.0.0
port: 9092
name: sasl_listen
```
See Redpanda docs for [enabling SASL/SCRAM](https://docs.redpanda.com/current/manage/security/authentication/#enable-sasl).
3. Enable TLS encryption.
SASL provides authentication, but not encryption. To enable SASL authentication with TLS encryption for the Kafka API, in redpanda.yaml, enter:
```yaml theme={"system"}
redpanda:
kafka_api:
- address: 0.0.0.0
port: 9092
name: sasl_tls_listener
authentication_method: sasl
kafka_api_tls:
- name: sasl_tls_listener
key_file: broker.key
cert_file: broker.crt
truststore_file: ca.crt
enabled: true
require_client_auth: false
```
See Redpanda docs for [enabling TLS encryption](https://docs.redpanda.com/current/manage/security/authentication/#enable-sasl-with-tls-encryption).
4. Confirm the SCRAM mechanism is enabled
To check if SASL/SCRAM is enabled, run the following command:
```bash theme={"system"}
rpk cluster config get sasl_mechanisms
```
You should see `SCRAM` in the output.
See Redpanda docs for [checking SASL/SCRAM](https://docs.redpanda.com/current/manage/security/authentication/#scram).
5. Restart Redpanda to apply the changes:
Restart your Redpanda server to apply the changes.
Redpanda uses `rpk`, a command-line tool, to manage users and ACLs.
Create the user "propel":
```bash theme={"system"}
rpk acl user create propel --password '' --mechanism SCRAM-SHA-256
```
Replace `` with a secure password.
Grant `DESCRIBE`, `READ`, and `DELETE` permissions to the "propel" user for the topics you need to ingest.
Use the `rpk acl` command to add ACLs for the "propel" user so that it can operate on the `propel-*` consumer groups.
```bash theme={"system"}
rpk acl create --allow-principal 'User:propel' --operation describe --operation read --operation delete --resource-pattern-type prefixed --group 'propel-'
```
For each topic you need to ingest to Propel, run the following command:
```bash theme={"system"}
rpk acl create --allow-principal 'User:propel' --operation describe --operation read --topic YOUR_TOPIC
```
These commands grant `DESCRIBE` and `READ` access to the topic "YOUR\_TOPIC" for the user "propel".
Verify that the ACLs have been correctly set by listing the ACLs for the topic "YOUR\_TOPIC":
```bash theme={"system"}
rpk acl list --topic YOUR_TOPIC
```
You should see the ACLs you added for the user "propel".
***
## 2. Make sure your Kafka cluster is accessible from Propel IPs.
To ensure that Propel can connect to your Kafka cluster, you need to authorize access from the following IP addresses:
```
18.219.73.236
3.15.73.135
3.17.239.162
```
## 3. Create a Kafka Data Pool
Go to the **"Data Pools"** section in the Console, click **"Create Data Pool"** and click on the **"Kafka"** tile.
7. Click **"Next"** and get your Key and Secret that you will use as a user and password to connect to your Kafka cluster.
After setting the permissions, you can verify them by clicking on the API key in the **"API Keys"** section and reviewing the roles and resources it has access to.
These instructions set up an IAM user with `READ` and `DESCRIBE` permissions in AWS MSK.
1. Sign in to the [AWS IAM Management Console](https://console.aws.amazon.com/iam/).
2. In the navigation pane, choose **"Users"** and then choose **"Create User**".
3. For **"Username"**, enter "propel" and click **"Next**".
4. Select **"Attach policies directly"**, search and select the `AmazonMSKReadOnlyAccess` policy, and click **"Next**".
5. Then, create a custom policy that grants describe, read, and delete permissions on MSK consumer groups prefixed with "propel-":
1. Click **"Create policy"**, then choose the JSON tab.
2. Paste the following JSON policy into the editor:
```json theme={"system"}
{
"Version": "2012-10-17",
"Statement": [
{
"Effect": "Allow",
"Action": [
"kafka-cluster:DescribeGroup",
"kafka-cluster:DeleteGroup",
"kafka-cluster:ReadGroup"
],
"Resource": "arn:aws:kafka:::group//propel-*"
}
]
}
```
3. Replace ``, ``, and `` with your actual AWS region, account ID, and MSK cluster name.
4. Click **"Review policy"**, give your policy a name (e.g., "PropelMSKPolicy"), and click **"Create policy**".
1. Click on the user "propel" you just created.
2. Click on the **"Security credentials"** tab and click on **"Create access key**".
3. Select **"Other"** and click **"Next**".
4. Enter any tags and click **"Create access key"** (optional: add metadata to the user by attaching tags as key-value pairs).
5. You now have the access key and secret you can use as user and password to connect to your Kafka cluster. Save these credentials securely, as you will not have access to the secret access key again after this step.
Follow these steps to enable SASL/SCRAM for authentication with Redpanda.
1. Edit the Redpanda configuration file (usually located at `/etc/redpanda/redpanda.yaml`).
2. Enable SASL/SCRAM by adding or updating the following configuration:
```yaml theme={"system"}
redpanda:
kafka_api:
- address: 0.0.0.0
port: 9092
name: sasl_listen
```
See Redpanda docs for [enabling SASL/SCRAM](https://docs.redpanda.com/current/manage/security/authentication/#enable-sasl).
3. Enable TLS encryption.
SASL provides authentication, but not encryption. To enable SASL authentication with TLS encryption for the Kafka API, in redpanda.yaml, enter:
```yaml theme={"system"}
redpanda:
kafka_api:
- address: 0.0.0.0
port: 9092
name: sasl_tls_listener
authentication_method: sasl
kafka_api_tls:
- name: sasl_tls_listener
key_file: broker.key
cert_file: broker.crt
truststore_file: ca.crt
enabled: true
require_client_auth: false
```
See Redpanda docs for [enabling TLS encryption](https://docs.redpanda.com/current/manage/security/authentication/#enable-sasl-with-tls-encryption).
4. Confirm the SCRAM mechanism is enabled
To check if SASL/SCRAM is enabled, run the following command:
```bash theme={"system"}
rpk cluster config get sasl_mechanisms
```
You should see `SCRAM` in the output.
See Redpanda docs for [checking SASL/SCRAM](https://docs.redpanda.com/current/manage/security/authentication/#scram).
5. Restart Redpanda to apply the changes:
Restart your Redpanda server to apply the changes.
Redpanda uses `rpk`, a command-line tool, to manage users and ACLs.
Create the user "propel":
```bash theme={"system"}
rpk acl user create propel --password '' --mechanism SCRAM-SHA-256
```
Replace `` with a secure password.
Grant `DESCRIBE`, `READ`, and `DELETE` permissions to the "propel" user for the topics you need to ingest.
Use the `rpk acl` command to add ACLs for the "propel" user so that it can operate on the `propel-*` consumer groups.
```bash theme={"system"}
rpk acl create --allow-principal 'User:propel' --operation describe --operation read --operation delete --resource-pattern-type prefixed --group 'propel-'
```
For each topic you need to ingest to Propel, run the following command:
```bash theme={"system"}
rpk acl create --allow-principal 'User:propel' --operation describe --operation read --topic YOUR_TOPIC
```
These commands grant `DESCRIBE` and `READ` access to the topic "YOUR\_TOPIC" for the user "propel".
Verify that the ACLs have been correctly set by listing the ACLs for the topic "YOUR\_TOPIC":
```bash theme={"system"}
rpk acl list --topic YOUR_TOPIC
```
You should see the ACLs you added for the user "propel".
***
## 2. Make sure your Kafka cluster is accessible from Propel IPs.
To ensure that Propel can connect to your Kafka cluster, you need to authorize access from the following IP addresses:
```
18.219.73.236
3.15.73.135
3.17.239.162
```
## 3. Create a Kafka Data Pool
Go to the **"Data Pools"** section in the Console, click **"Create Data Pool"** and click on the **"Kafka"** tile.
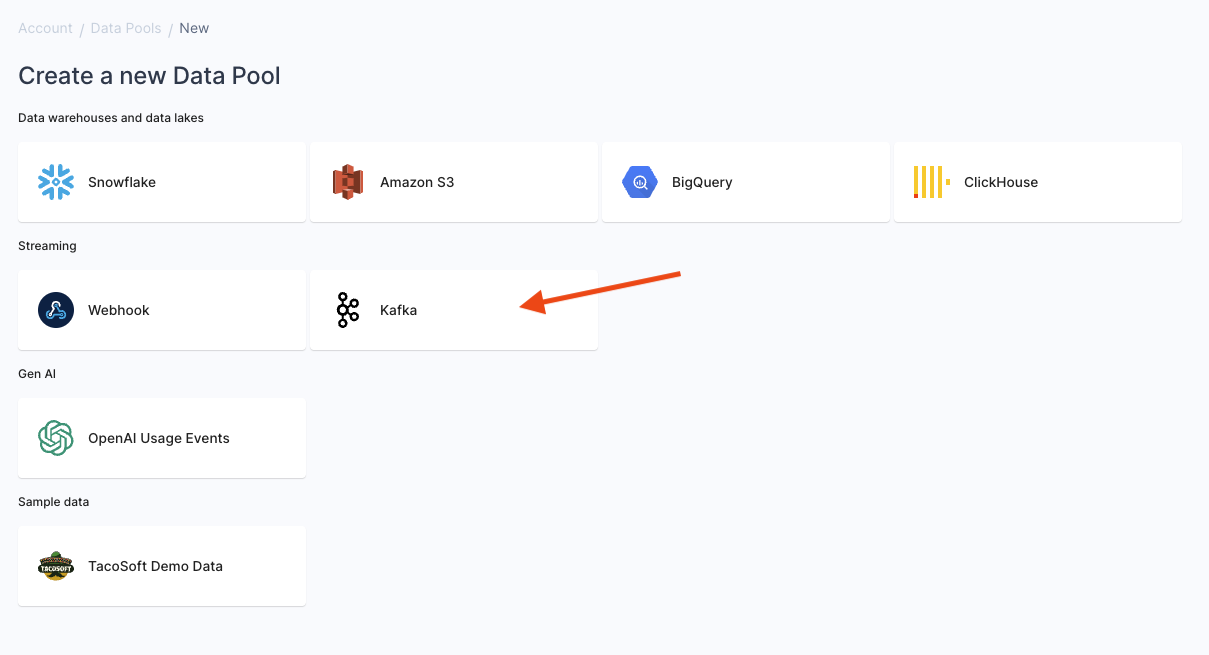 If you create a Kafka Data Pool for the first time, you must create your Kafka credentials for Propel to connect to your Kafka servers.
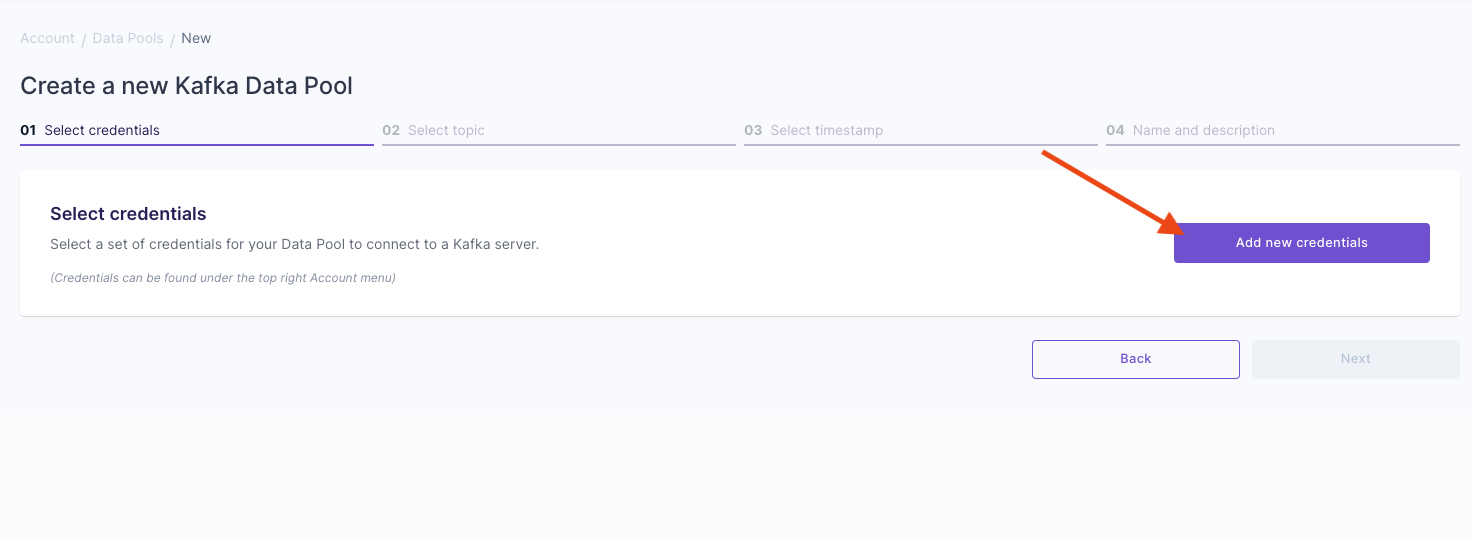 To create your Kafka credentials, you will need the following details:
* **Bootstrap servers**: The list of addresses for your Kafka cluster's brokers.
* **Authentication type**: The authentication protocol used by your Kafka cluster: SASL/SCRAM-SHA-256, SASL/SCRAM-SHA-512, SASL/PLAIN, or NONE.
* **TLS**: Whether your Kafka cluster uses TLS for secure communication.
* **Username**: The username for the user you created in your Kafka cluster.
* **Password**: The password for the user you created in your Kafka cluster.
To create your Kafka credentials, you will need the following details:
* **Bootstrap servers**: The list of addresses for your Kafka cluster's brokers.
* **Authentication type**: The authentication protocol used by your Kafka cluster: SASL/SCRAM-SHA-256, SASL/SCRAM-SHA-512, SASL/PLAIN, or NONE.
* **TLS**: Whether your Kafka cluster uses TLS for secure communication.
* **Username**: The username for the user you created in your Kafka cluster.
* **Password**: The password for the user you created in your Kafka cluster.
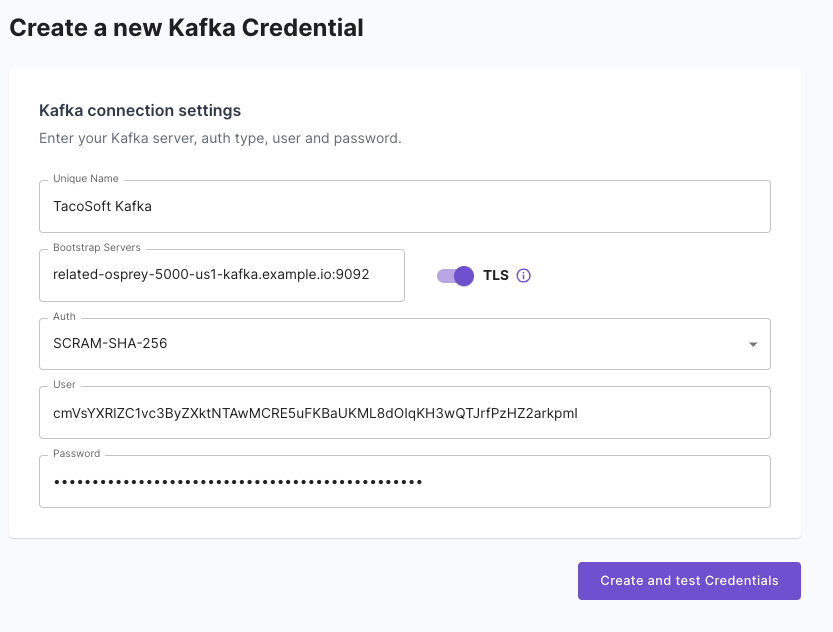 After entering your Kafka credentials, click **"Create and test credentials"** to ensure Propel can successfully connect to your Kafka cluster. If the connection is successful, you will see a confirmation message. If not, check your entered credentials and try again.
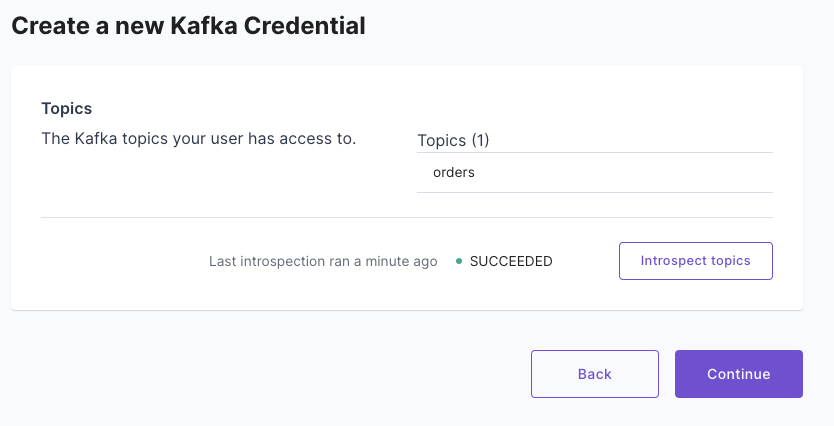
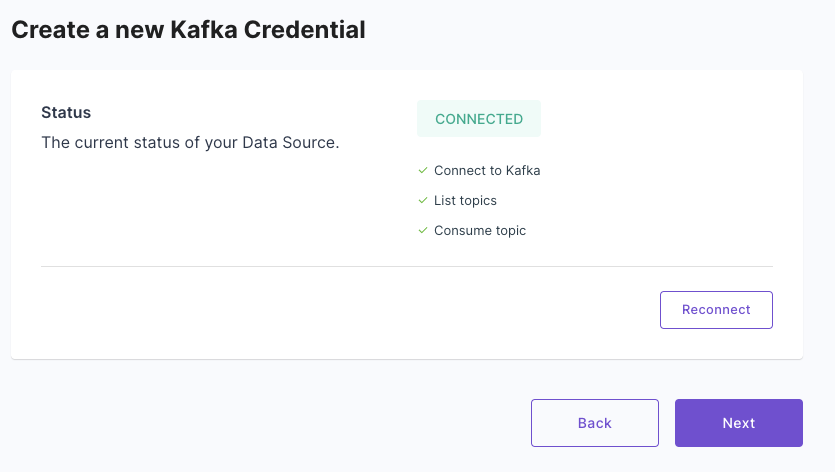 Here, you will see a list of topics available to ingest. If you don't see the topic you want to ingest, make sure your user has the right permissions to access the topic.
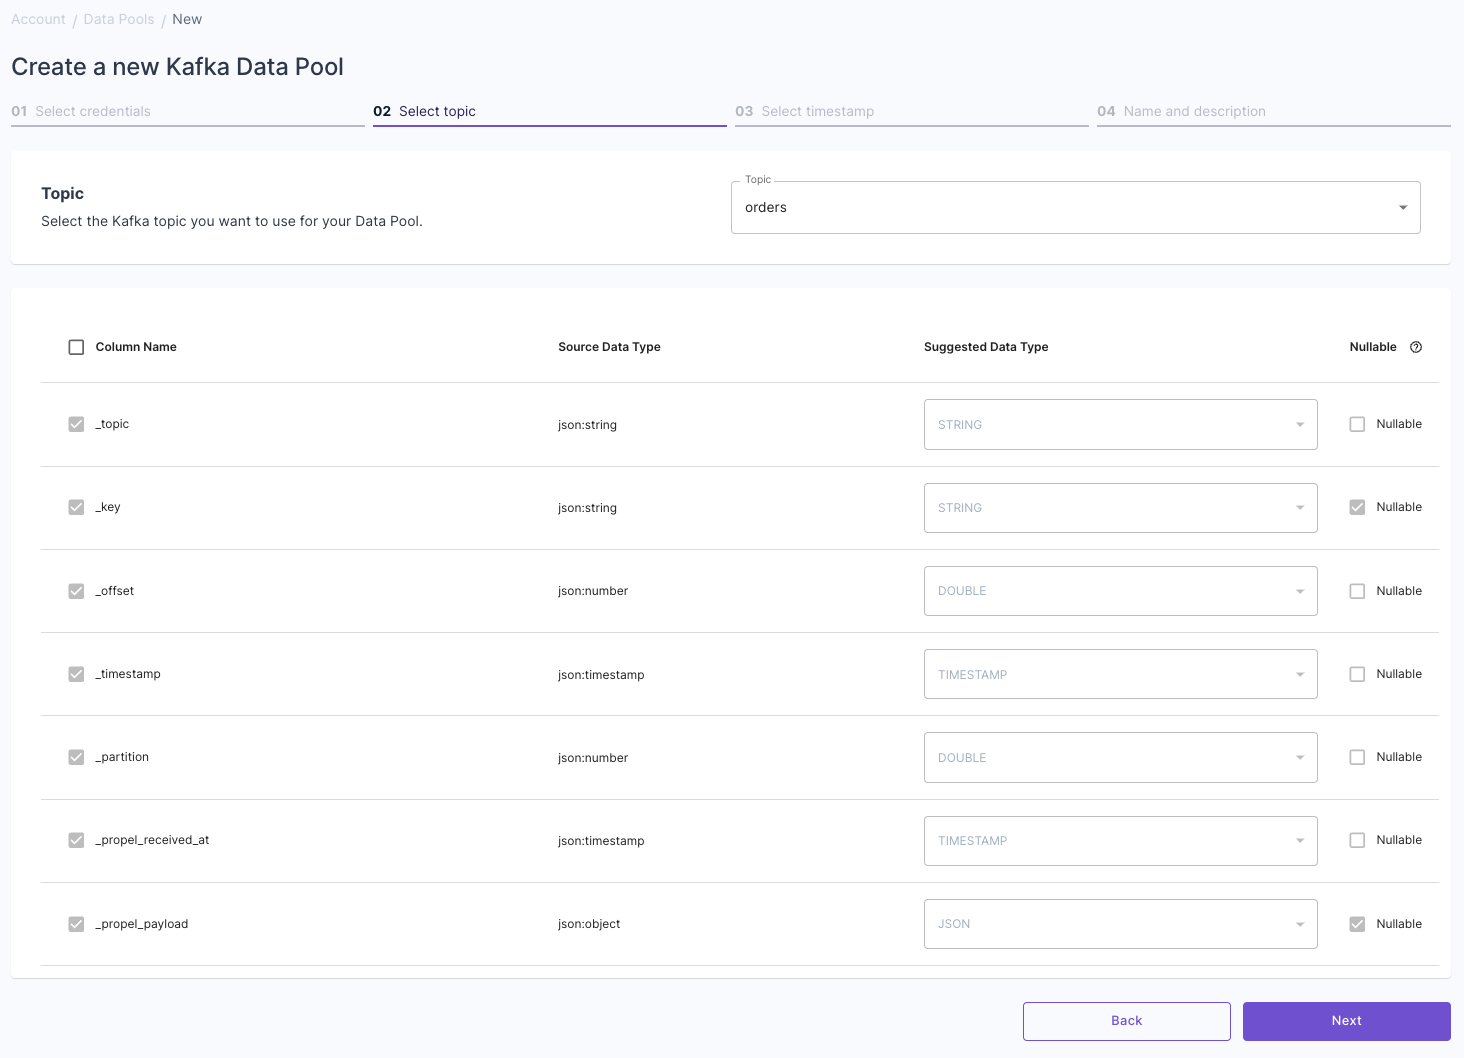
 Here, you will see a list of topics available to ingest. Select the topic you want to ingest into this Data Pool. You will see the schema of the Data Pool.
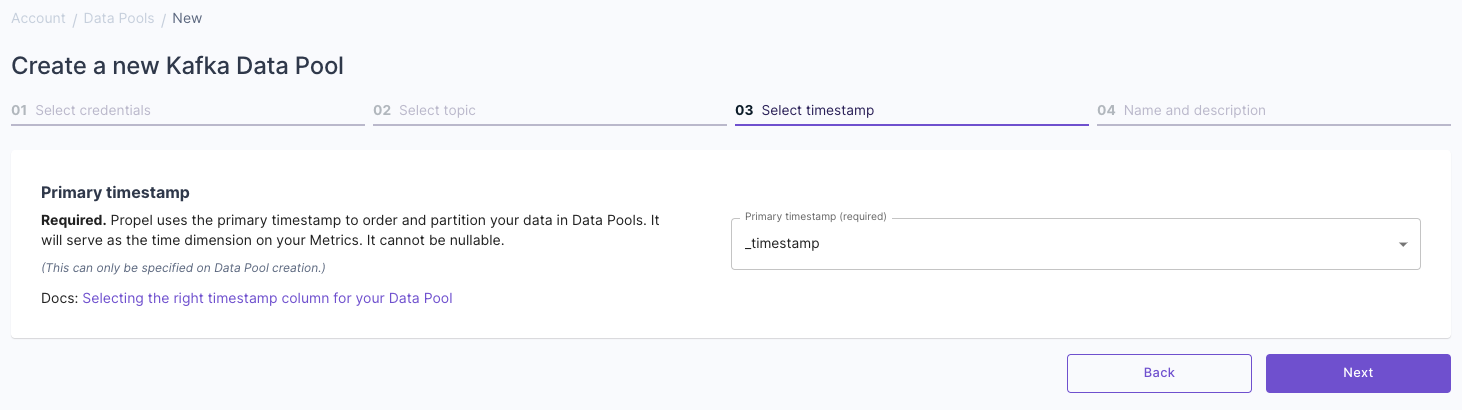
 Next, you need to select the timestamp column. This is the column that will be used to order the data in the Data Pool. By default, Propel selects the `_timestamp` generated by Kafka.
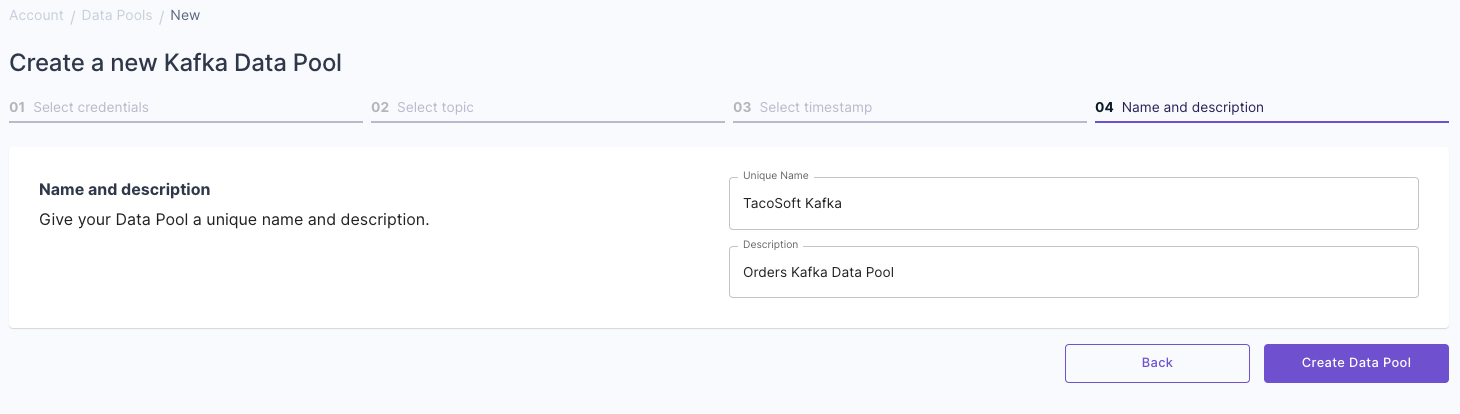
 After you've selected the topic, provide a name for your Data Pool. This name will be used to identify the Data Pool in Propel. Once you've named your Data Pool, click **"Create Data Pool"**. Propel will then start ingesting data from the selected Kafka topics into your Data Pool.
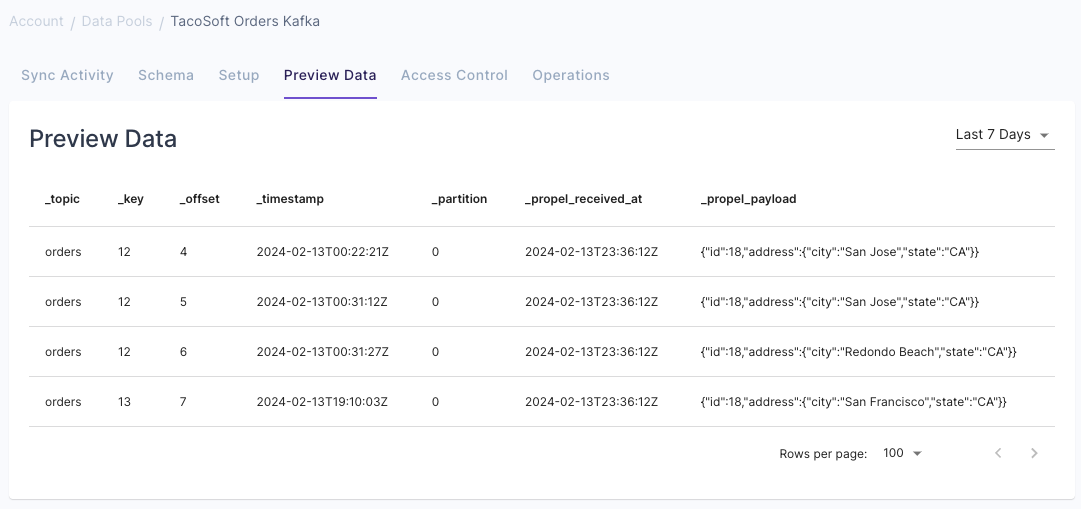
 Once you've started ingesting data, you can view the data in your Data Pool. Go to the **"Data Pools"** section in the Console, click on your Kafka Data Pool, and click on the **"Preview Data"** tab. Here, you can see the data that has been ingested from your Kafka topic.
 First, you need to create a Data Source with your Kafka credentials.
```graphql theme={"system"}
mutation {
createKafkaDataSource(input: {
uniqueName: "KafkaCredentials"
description:"My Kafka Credentials"
connectionSettings: {
auth: "SCRAM-SHA-256"
bootstrapServers: ["kafka-us1.example.io:9092"]
tls: true
user:"propel-user"
password: ""
}
}){
dataSource {
id
uniqueName
status
}
}
}
```
To create the Data Pool, you need to:
* Take the `id` of the Data Source to create the Data Pool replacing the `` in the example below.
* Provide the name of the topic to ingest in the `table` field.
* Do not add any columns as Kafka Data Pools have a set schema.
```graphql theme={"system"}
mutation {
createDataPoolV2(
input: {
dataSource: "",
table: "MyTopic"
timestamp: {
columnName: "_timestamp"
},
uniqueName: "yourUniqueDataPoolName",
description: "Data Pool for handling specific event streams",
accessControlEnabled: true,
tableSettings: {
engine: {
replacingMergeTree: {
type: REPLACING_MERGE_TREE
}
}
orderBy: ["_topic", "_partition", "_timestamp", "_offset"],
partitionBy: ["toYYYYMM(_timestamp, 'UTC')"]
}
}
) {
dataPool {
id
uniqueName
description
columns {
nodes {
columnName
clickHouseType
isNullable
}
}
}
}
}
```
```hcl theme={"system"}
resource "propel_data_source" "my_kafka" {
unique_name = "KafkaCredentials"
description = "My Kafka Credentials"
type = "KAFKA"
kafka_connection_settings {
auth = "SCRAM-SHA-256"
bootstrap_servers = ["kafka-us1.example.io:9092"]
tls = true
user = "propel-user"
password = var.kafka_password
}
}
variable "kafka_password" {
type = string
sensitive = true
}
resource "propel_data_pool" "kafka_data_pool" {
unique_name = "yourUniqueDataPoolName"
description = "Data Pool for handling specific event streams"
data_source = propel_kafka_data_source.kafka_data_source.id
table = "MyTopic"
timestamp = "_timestamp"
access_control_enabled = true
}
```
***
First, you need to create a Data Source with your Kafka credentials.
```graphql theme={"system"}
mutation {
createKafkaDataSource(input: {
uniqueName: "KafkaCredentials"
description:"My Kafka Credentials"
connectionSettings: {
auth: "SCRAM-SHA-256"
bootstrapServers: ["kafka-us1.example.io:9092"]
tls: true
user:"propel-user"
password: ""
}
}){
dataSource {
id
uniqueName
status
}
}
}
```
To create the Data Pool, you need to:
* Take the `id` of the Data Source to create the Data Pool replacing the `` in the example below.
* Provide the name of the topic to ingest in the `table` field.
* Do not add any columns as Kafka Data Pools have a set schema.
```graphql theme={"system"}
mutation {
createDataPoolV2(
input: {
dataSource: "",
table: "MyTopic"
timestamp: {
columnName: "_timestamp"
},
uniqueName: "yourUniqueDataPoolName",
description: "Data Pool for handling specific event streams",
accessControlEnabled: true,
tableSettings: {
engine: {
replacingMergeTree: {
type: REPLACING_MERGE_TREE
}
}
orderBy: ["_topic", "_partition", "_timestamp", "_offset"],
partitionBy: ["toYYYYMM(_timestamp, 'UTC')"]
}
}
) {
dataPool {
id
uniqueName
description
columns {
nodes {
columnName
clickHouseType
isNullable
}
}
}
}
}
```
```hcl theme={"system"}
resource "propel_data_source" "my_kafka" {
unique_name = "KafkaCredentials"
description = "My Kafka Credentials"
type = "KAFKA"
kafka_connection_settings {
auth = "SCRAM-SHA-256"
bootstrap_servers = ["kafka-us1.example.io:9092"]
tls = true
user = "propel-user"
password = var.kafka_password
}
}
variable "kafka_password" {
type = string
sensitive = true
}
resource "propel_data_pool" "kafka_data_pool" {
unique_name = "yourUniqueDataPoolName"
description = "Data Pool for handling specific event streams"
data_source = propel_kafka_data_source.kafka_data_source.id
table = "MyTopic"
timestamp = "_timestamp"
access_control_enabled = true
}
```
***