> ## Documentation Index
> Fetch the complete documentation index at: https://www.propeldata.com/llms.txt
> Use this file to discover all available pages before exploring further.
# Snowflake setup guide
> Ingesting data from Snowflake into Propel.
This guide covers how to:
1. [Find your Snowflake Account Identifier](#step-1-find-your-snowflake-account-identifier)
2. [Ensure change tracking is enabled on your Snowflake tables.](#step-2-ensure-change-tracking-is-enabled)
3. [Create a Snowflake user, role, and warehouse.](#step-3-create-the-snowflake-user-role-and-warehouse)
4. [(Optional) Configure Snowflake Network Policy.](#step-4-optional-configure-snowflake-network-policy)
5. [Create a Snowflake Data Pool](#step-5-create-a-snowflake-data-pool)
***
## Requirements
* You have a [Propel account](https://console.propeldata.com/get-started).
* You have a Snowflake account.
* You have a Snowflake user with the `SECURITYADMIN`, `SYSADMIN`, and `ACCOUNTADMIN` [system-defined roles](https://docs.snowflake.com/en/user-guide/security-access-control-overview.html#system-defined-roles).
***
## Step 1: Find your Snowflake Account Identifier
Your Snowflake Account Identifier is a string composed of your account locator, region, and cloud.
The Snowflake Account Identifier is different from the Snowflake Account Name.
Here is how to find your Snowflake Account Identifier:
### Option 1: Using SQL
To find your Snowflake Account Identifier, run the following queries in your Snowflake worksheet:
```sql theme={"system"}
SELECT CURRENT_ACCOUNT();
```
and
```sql theme={"system"}
SELECT LOWER(REPLACE(CURRENT_REGION(), '_', '-')) AS region_in_lower_case;
```
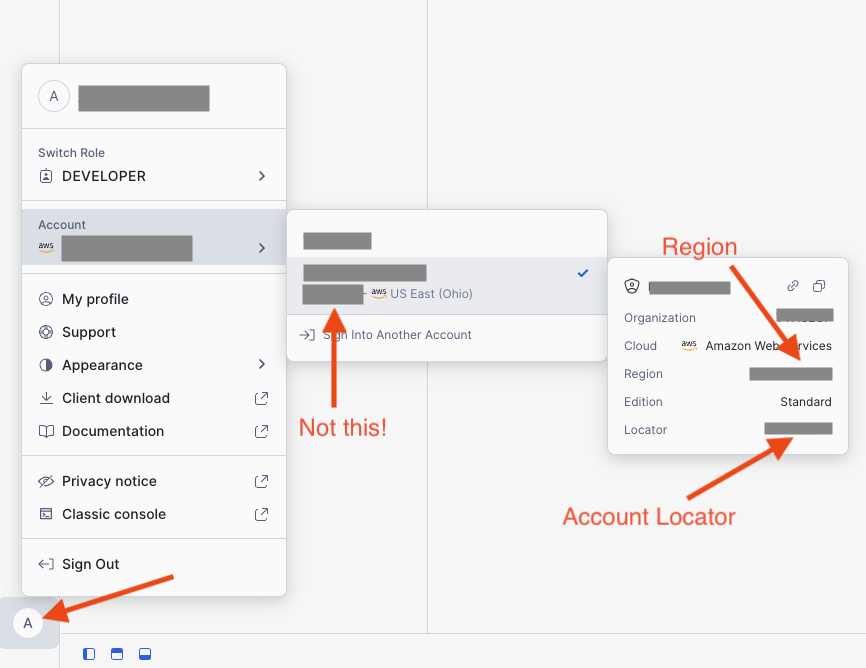
### Option 2: Using the UI
Using the UI, you can find your Snowflake Account Identifier by clicking on your account menu on the bottom left.
 ***
The Snowflake Account Identifier is a string in the following format depending on the region and cloud:
* `` or
* `.` or
* `..`
Where:
* `cloud_region_id` is the identifier for the cloud region (dictated by the cloud platform).
* `cloud` is the identifier for the cloud platform (aws, azure, or gcp).
The following are examples of the Snowflake Account Locator for different regions and clouds, for the full list see the [Snowflake documentation](https://docs.snowflake.com/en/user-guide/admin-account-identifier#format-2-account-locator-in-a-region).
* AWS US West (Oregon): `xy12345` (No region, no cloud)
* AWS US East (N. Virginia): `xy12345.us-east-1` (No cloud)
* AWS US East (Ohio): `xy12345.us-east-2.aws`
* GCP US Central1 (Iowa): `xy12345.us-central1.gcp`
* GCP US East4 (N. Virginia): `xy12345.us-east4.gcp`
* AWS Canada (Central): `xy12345.ca-central-1.aws`
* Azure West US 2 (Washington): `xy12345.west-us-2.azure`
* Azure Central US (Iowa): `xy12345.central-us.azure`
* Azure South Central US (Texas): `xy12345.south-central-us.azure`
* Azure East US 2 (Virginia): `xy12345.east-us-2.azure`
* Azure Canada Central (Toronto): `xy12345.canada-central.azure`
* AWS EU (Ireland): `xy12345.eu-west-1` (No cloud)
* AWS EU (London): `xy12345.eu-west-2.aws`
* AWS EU (Paris): `xy12345.eu-west-3.aws`
* AWS EU (Frankfurt): `xy12345.eu-central-1` (No cloud)
* AWS EU (Zurich): `xy12345.eu-central-2.aws`
* AWS EU (Stockholm): `xy12345.eu-north-1.aws`
* GCP Europe West2 (London): `xy12345.europe-west2.gcp`
* GCP Europe West4 (Netherlands): `xy12345.europe-west4.gcp`
* Azure UK South (London): `xy12345.uk-south.azure`
* Azure North Europe (Ireland): `xy12345.north-europe.azure`
* Azure West Europe (Netherlands): `xy12345.west-europe.azure`
* Azure Switzerland North (Zurich): `xy12345.switzerland-north.azure`
* AWS South America (Sao Paulo): `xy12345.sa-east-1.aws`
* AWS Asia Pacific (Tokyo): `xy12345.ap-northeast-1.aws`
* AWS Asia Pacific (Osaka): `xy12345.ap-northeast-3.aws`
* AWS Asia Pacific (Seoul): `xy12345.ap-northeast-2.aws`
* AWS Asia Pacific (Mumbai): `xy12345.ap-south-1.aws`
* AWS Asia Pacific (Singapore): `xy12345.ap-southeast-1` (No cloud)
* AWS Asia Pacific (Sydney): `xy12345.ap-southeast-2` (No cloud)
* AWS Asia Pacific (Jakarta): `xy12345.ap-southeast-3.aws`
* Azure Asia Pacific (Singapore): `xy12345.ap-southeast-1`
* Azure Asia Pacific (Sydney): `xy12345.ap-southeast-2`
* Azure Asia Pacific (Jakarta): `xy12345.ap-southeast-3`
* Azure Central India (Pune): `xy12345.central-india.azure`
* Azure Japan East (Tokyo): `xy12345.japan-east.azure`
* Azure Southeast Asia (Singapore): `xy12345.southeast-asia.azure`
The account identifier does not include the
***
The Snowflake Account Identifier is a string in the following format depending on the region and cloud:
* `` or
* `.` or
* `..`
Where:
* `cloud_region_id` is the identifier for the cloud region (dictated by the cloud platform).
* `cloud` is the identifier for the cloud platform (aws, azure, or gcp).
The following are examples of the Snowflake Account Locator for different regions and clouds, for the full list see the [Snowflake documentation](https://docs.snowflake.com/en/user-guide/admin-account-identifier#format-2-account-locator-in-a-region).
* AWS US West (Oregon): `xy12345` (No region, no cloud)
* AWS US East (N. Virginia): `xy12345.us-east-1` (No cloud)
* AWS US East (Ohio): `xy12345.us-east-2.aws`
* GCP US Central1 (Iowa): `xy12345.us-central1.gcp`
* GCP US East4 (N. Virginia): `xy12345.us-east4.gcp`
* AWS Canada (Central): `xy12345.ca-central-1.aws`
* Azure West US 2 (Washington): `xy12345.west-us-2.azure`
* Azure Central US (Iowa): `xy12345.central-us.azure`
* Azure South Central US (Texas): `xy12345.south-central-us.azure`
* Azure East US 2 (Virginia): `xy12345.east-us-2.azure`
* Azure Canada Central (Toronto): `xy12345.canada-central.azure`
* AWS EU (Ireland): `xy12345.eu-west-1` (No cloud)
* AWS EU (London): `xy12345.eu-west-2.aws`
* AWS EU (Paris): `xy12345.eu-west-3.aws`
* AWS EU (Frankfurt): `xy12345.eu-central-1` (No cloud)
* AWS EU (Zurich): `xy12345.eu-central-2.aws`
* AWS EU (Stockholm): `xy12345.eu-north-1.aws`
* GCP Europe West2 (London): `xy12345.europe-west2.gcp`
* GCP Europe West4 (Netherlands): `xy12345.europe-west4.gcp`
* Azure UK South (London): `xy12345.uk-south.azure`
* Azure North Europe (Ireland): `xy12345.north-europe.azure`
* Azure West Europe (Netherlands): `xy12345.west-europe.azure`
* Azure Switzerland North (Zurich): `xy12345.switzerland-north.azure`
* AWS South America (Sao Paulo): `xy12345.sa-east-1.aws`
* AWS Asia Pacific (Tokyo): `xy12345.ap-northeast-1.aws`
* AWS Asia Pacific (Osaka): `xy12345.ap-northeast-3.aws`
* AWS Asia Pacific (Seoul): `xy12345.ap-northeast-2.aws`
* AWS Asia Pacific (Mumbai): `xy12345.ap-south-1.aws`
* AWS Asia Pacific (Singapore): `xy12345.ap-southeast-1` (No cloud)
* AWS Asia Pacific (Sydney): `xy12345.ap-southeast-2` (No cloud)
* AWS Asia Pacific (Jakarta): `xy12345.ap-southeast-3.aws`
* Azure Asia Pacific (Singapore): `xy12345.ap-southeast-1`
* Azure Asia Pacific (Sydney): `xy12345.ap-southeast-2`
* Azure Asia Pacific (Jakarta): `xy12345.ap-southeast-3`
* Azure Central India (Pune): `xy12345.central-india.azure`
* Azure Japan East (Tokyo): `xy12345.japan-east.azure`
* Azure Southeast Asia (Singapore): `xy12345.southeast-asia.azure`
The account identifier does not include the snowflakecomputing.com domain.
Save your Snowflake Account Identifier and region as you will need them in the next steps.
## Step 2: Ensure change tracking is enabled
Before setting up a Snowflake Data Pool (Propel's high-speed data store and cache), it's important to make sure CHANGE\_TRACKING is enabled on the tables that you want to use as the underlying data.
You can enable it with the following command:
```sql theme={"system"}
ALTER TABLE YOUR_TABLE_NAME SET CHANGE_TRACKING = TRUE;
```
## Step 3: Create the Snowflake user, role, and warehouse
Next, you need to create the Snowflake user, role, and warehouse for Propel.
We recommend creating a dedicated user, role, and warehouse for Propel. By creating a dedicated role and user, you can apply the [principle of least privilege](https://en.wikipedia.org/wiki/Principle_of_least_privilege) to give it only the necessary privileges. Additionally, by having a dedicated warehouse, you can monitor and control costs and ensure you have the necessary compute resources to operate the integration.
Copy the script below to a new [Snowflake worksheet](https://docs.snowflake.com/en/user-guide/ui-worksheet.html) and select the "All Queries" checkbox.
Make sure you replace the values for the `user_password`, `database_name`, and `schema_name` variables with the following values **before running the script**.
* `user_password` it must be at least 8 characters long, contain at least 1 digit, 1 uppercase letter and 1 lowercase letter
* `database_name` with the name of the Snowflake database where your schema is located, for example `ANALYTICS`.
* `schema_name` with the database and schema name where your tables are located, for example `ANALYTICS.PUBLIC`.
You will need to run this script with a user that has `SECURITYADMIN` and `ACCOUNTADMIN` [system-defined roles](https://docs.snowflake.com/en/user-guide/security-access-control-overview.html#system-defined-roles).
```jsx theme={"system"}
begin;
use role accountadmin;
/* Create variables for user, password, role, warehouse, database, and schema (needs to be uppercase for objects) */
set role_name = 'PROPELLER';
set user_name = 'PROPEL_USER';
set warehouse_name = 'PROPELLING';
/* Must be at least 8 characters long, contain at least 1 digit, 1 uppercase letter and 1 lowercase letter */
set user_password = ''; /* Replace with a strong password */
set database_name = 'ANALYTICS'; /* Replace with your Snowflake database name */
set schema_name = 'ANALYTICS.PUBLIC'; /* Replace with your Snowflake schema name */
/* Grant sysadmin role access to the database */
grant usage,modify
on database identifier($database_name)
to role sysadmin;
/* Grant sysadmin role access to the schema */
grant usage,modify
on schema identifier($schema_name)
to role sysadmin;
/* Change role to securityadmin for user / role steps */
use role securityadmin;
/* Create a role for Propel */
create role if not exists identifier($role_name);
grant role identifier($role_name) to role SYSADMIN;
/* Change role to sysadmin for warehouse and database steps */
use role sysadmin;
/* Create a warehouse for Propel */
create warehouse if not exists identifier($warehouse_name)
warehouse_size = xsmall
warehouse_type = standard
auto_suspend = 60
auto_resume = true
initially_suspended = true;
/* Change role to securityadmin for user / role steps */
use role securityadmin;
/* Create a user for Propel */
create user if not exists identifier($user_name)
password = $user_password
default_role = $role_name
default_warehouse = $warehouse_name;
grant role identifier($role_name) to user identifier($user_name);
/* Change role to accountadmin for warehouse and database steps */
use role accountadmin;
/* Grant Propel role access to the warehouse */
grant usage, monitor
on warehouse identifier($warehouse_name)
to role identifier($role_name);
/* Grant Propel role access to the database */
grant usage, monitor
on database identifier($database_name)
to role identifier($role_name);
/* Grant Propel role access to the schema */
grant create procedure, create stage, create task, create stream, usage
on schema identifier($schema_name)
to role identifier($role_name);
/* Grant Propel role select on all tables in the schema */
grant select on all tables
in schema identifier($schema_name)
to role identifier($role_name);
/* Grant Propel role select on all future tables in the schema */
grant select on future tables
in schema identifier($schema_name)
to role identifier($role_name);
grant execute task on account
to role identifier($role_name);
commit;
```
## Step 4: (Optional) Configure Snowflake Network Policy
If you have defined a [Snowflake Network Policy](https://docs.snowflake.com/en/user-guide/network-policies.html#), you need to update it to include the Propel IP address by following the instructions on [modifying network policies](https://docs.snowflake.com/en/user-guide/network-policies.html#modifying-network-policies).
Propel IP Addresses:
```
18.219.73.236
3.15.73.135
3.17.239.162
```
## Step 5: Create a Snowflake Data Pool
Now that you have created the Snowflake user, role, and warehouse, you can create a Snowflake Data Pool.
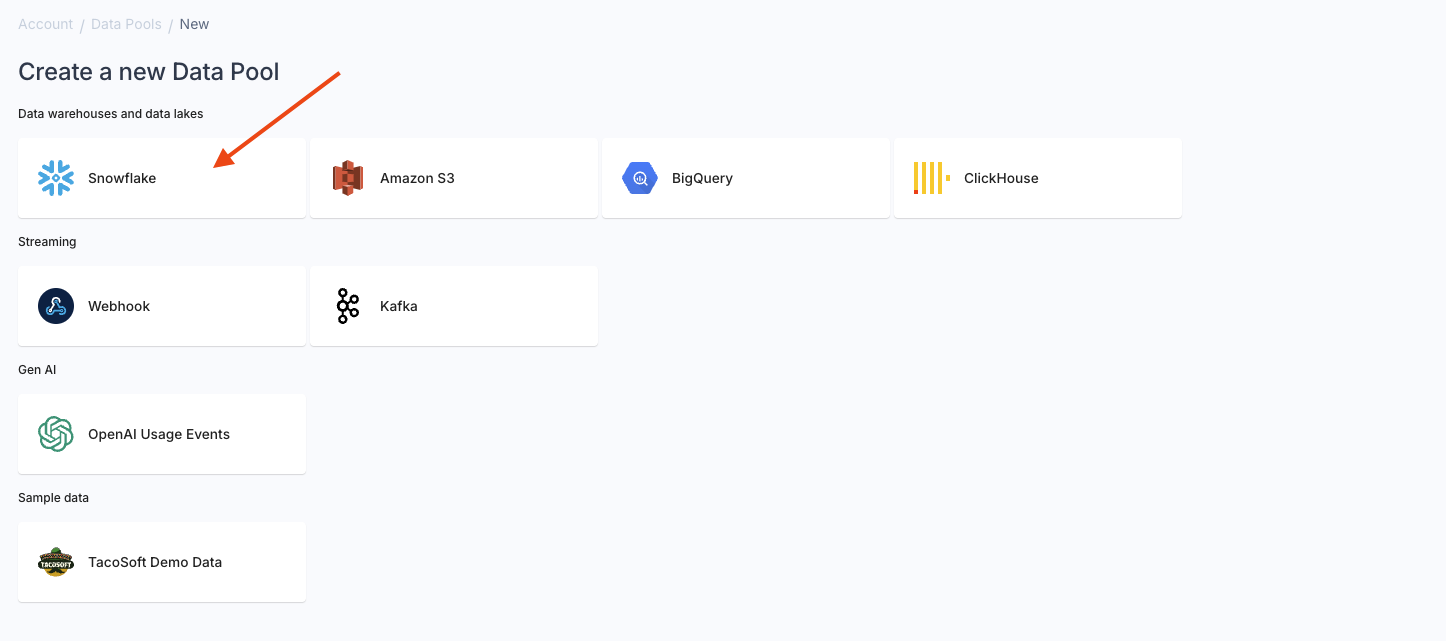
Go to the **“Data Pools”** section in the Console, click **“Create Data Pool”** and click on the **“Snowflake”** tile.
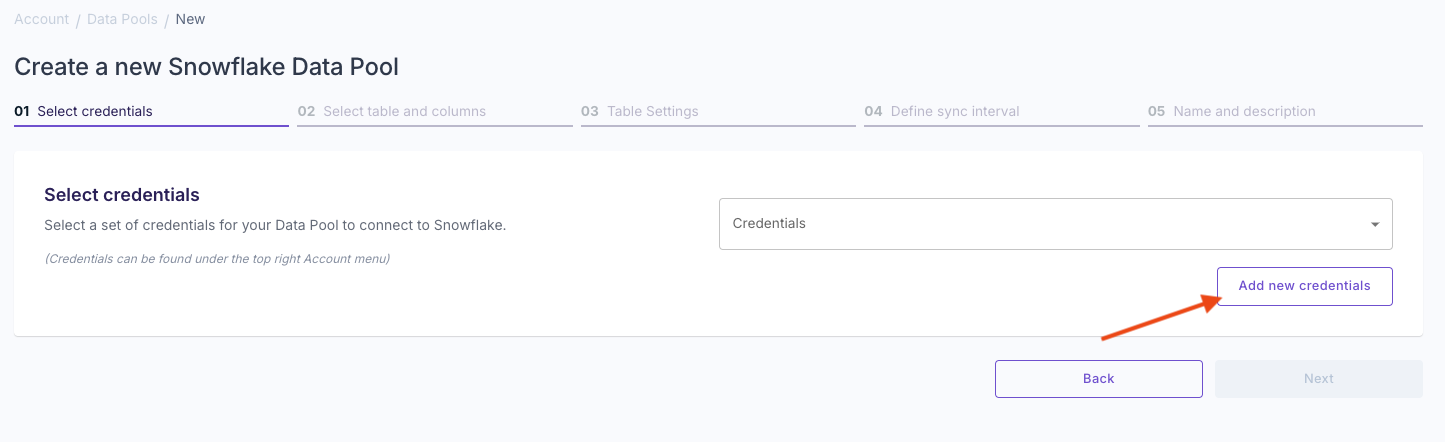
 If you create a Snowflake Data Pool for the first time, you must create your Snowflake credentials for Propel to connect to your Snowflake account.
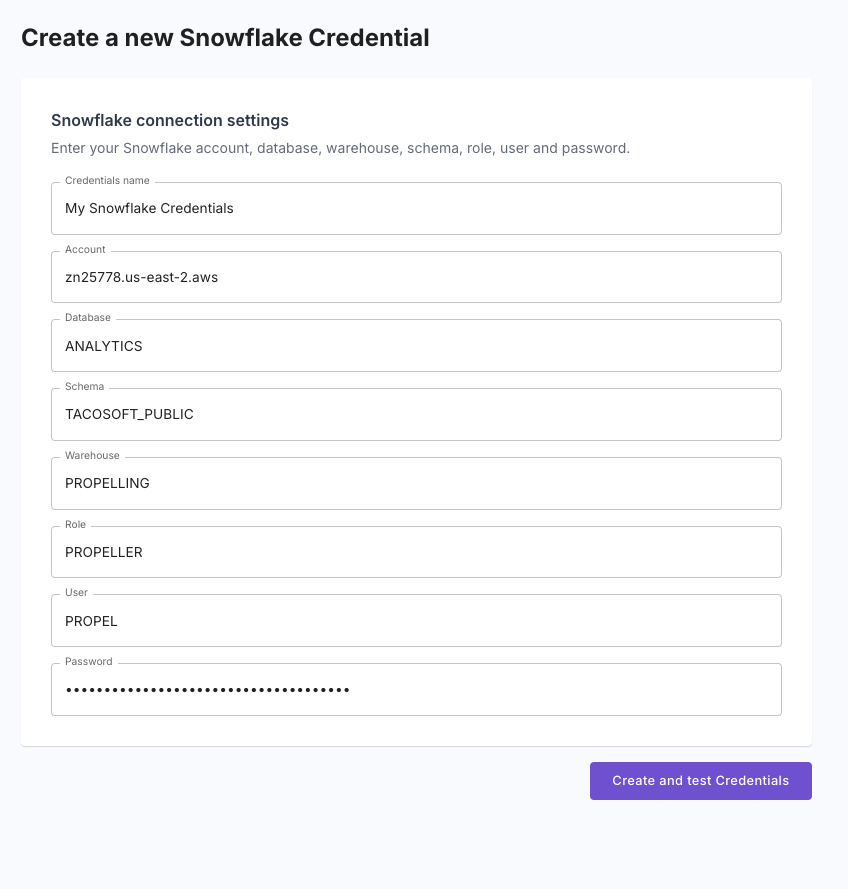
 To create your Snowflake credentials, you will need the following details:
* **Credentials name**: A name to identify the credentials in Propel.
* **Snowflake Account Identifier**: The account identifier from [Step 1](#step-1-find-your-snowflake-account-identifier).
* **Database**: The database where your schema is located, for example `ANALYTICS`.
* **Schema**: The database and schema name where your tables are located, for example `PUBLIC`.
* **Warehouse**: The warehouse you created in [Step 3](#step-3-create-the-snowflake-user-role-and-warehouse).
* **Role**: The role you created in [Step 3](#step-3-create-the-snowflake-user-role-and-warehouse).
* **User**: The user you created in [Step 3](#step-3-create-the-snowflake-user-role-and-warehouse).
* **Password**: The password for the user you created in [Step 3](#step-3-create-the-snowflake-user-role-and-warehouse).
To create your Snowflake credentials, you will need the following details:
* **Credentials name**: A name to identify the credentials in Propel.
* **Snowflake Account Identifier**: The account identifier from [Step 1](#step-1-find-your-snowflake-account-identifier).
* **Database**: The database where your schema is located, for example `ANALYTICS`.
* **Schema**: The database and schema name where your tables are located, for example `PUBLIC`.
* **Warehouse**: The warehouse you created in [Step 3](#step-3-create-the-snowflake-user-role-and-warehouse).
* **Role**: The role you created in [Step 3](#step-3-create-the-snowflake-user-role-and-warehouse).
* **User**: The user you created in [Step 3](#step-3-create-the-snowflake-user-role-and-warehouse).
* **Password**: The password for the user you created in [Step 3](#step-3-create-the-snowflake-user-role-and-warehouse).
 After entering your Snowflake credentials, click **“Create and test credentials”** to ensure Propel can successfully connect to your Snowflake account.
If the connection is successful, you will see a confirmation message. If not, check your entered credentials and try again.
After entering your Snowflake credentials, click **“Create and test credentials”** to ensure Propel can successfully connect to your Snowflake account.
If the connection is successful, you will see a confirmation message. If not, check your entered credentials and try again.
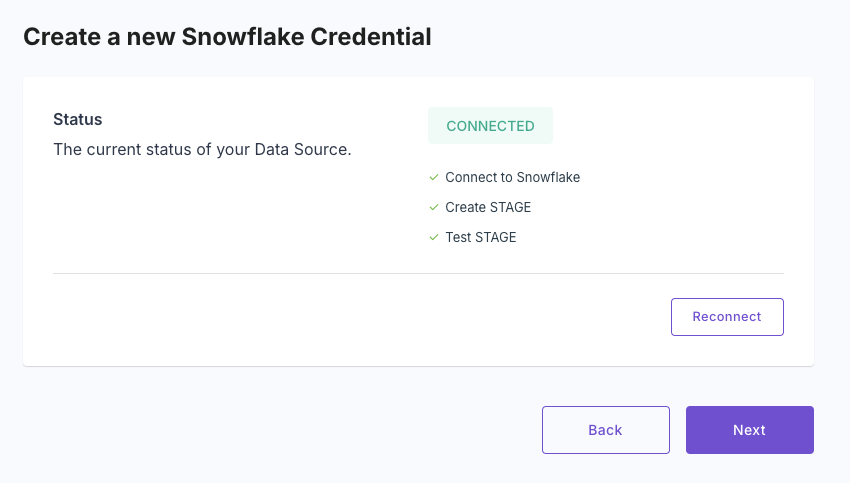 Here, you will see a list of tables available to ingest. If you don't see the table you want to ingest, make sure your user has the right permissions to access the table.
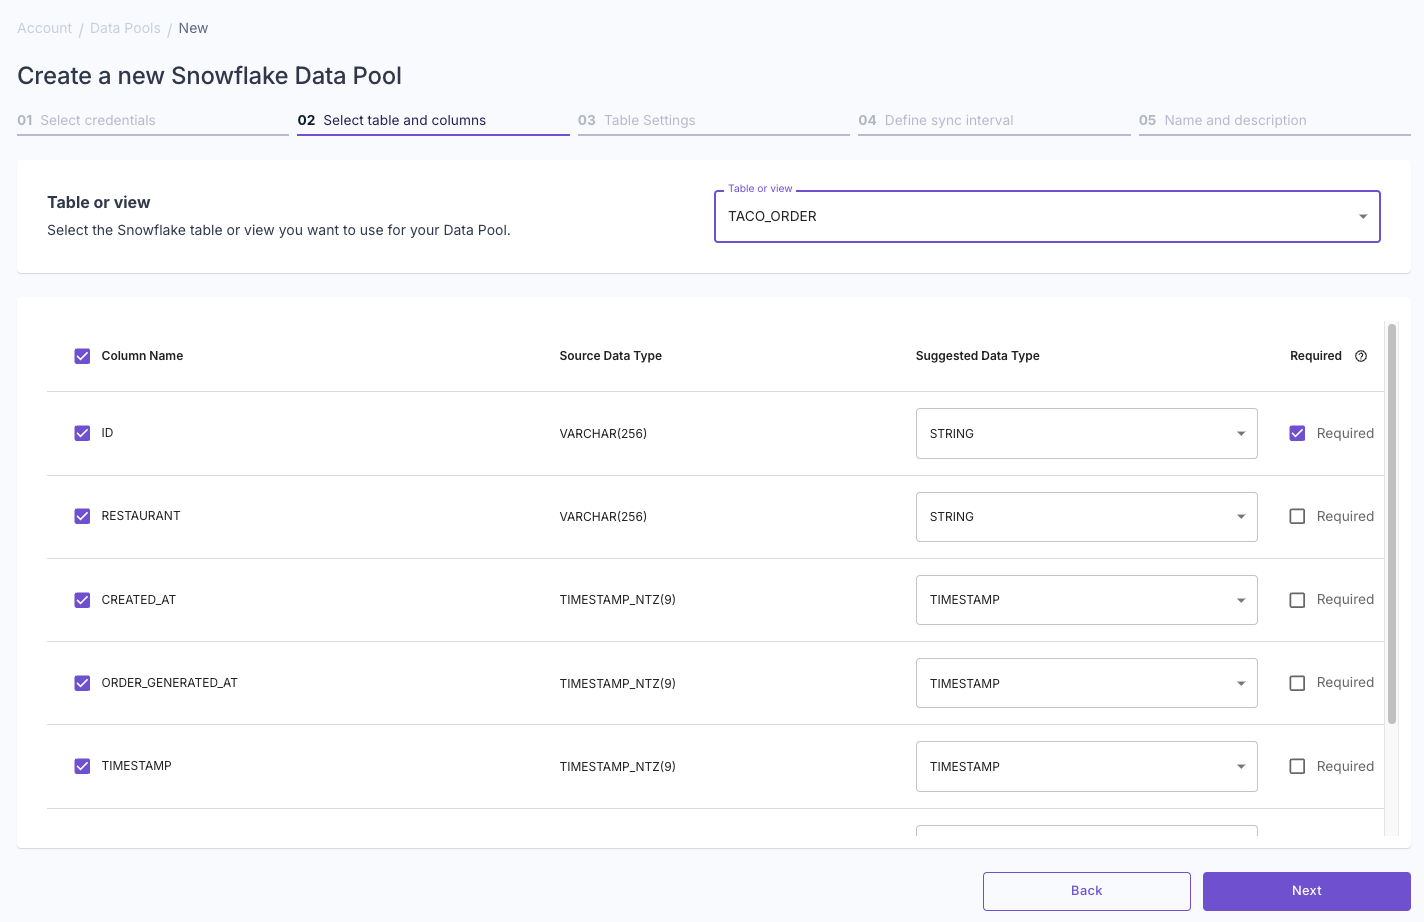
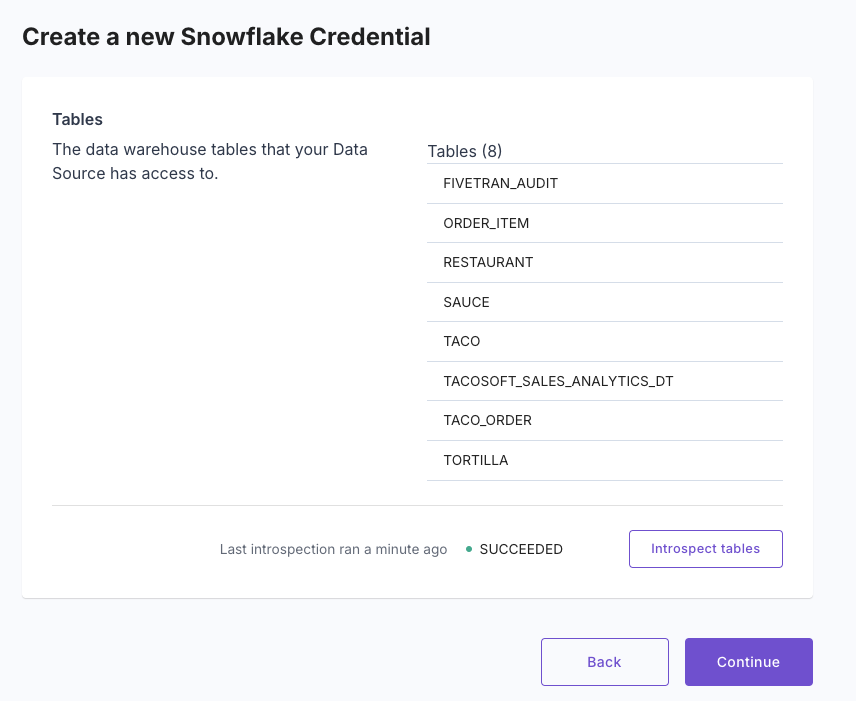 Continue with the setup flow, and then select the table as well as the columns you want to use.
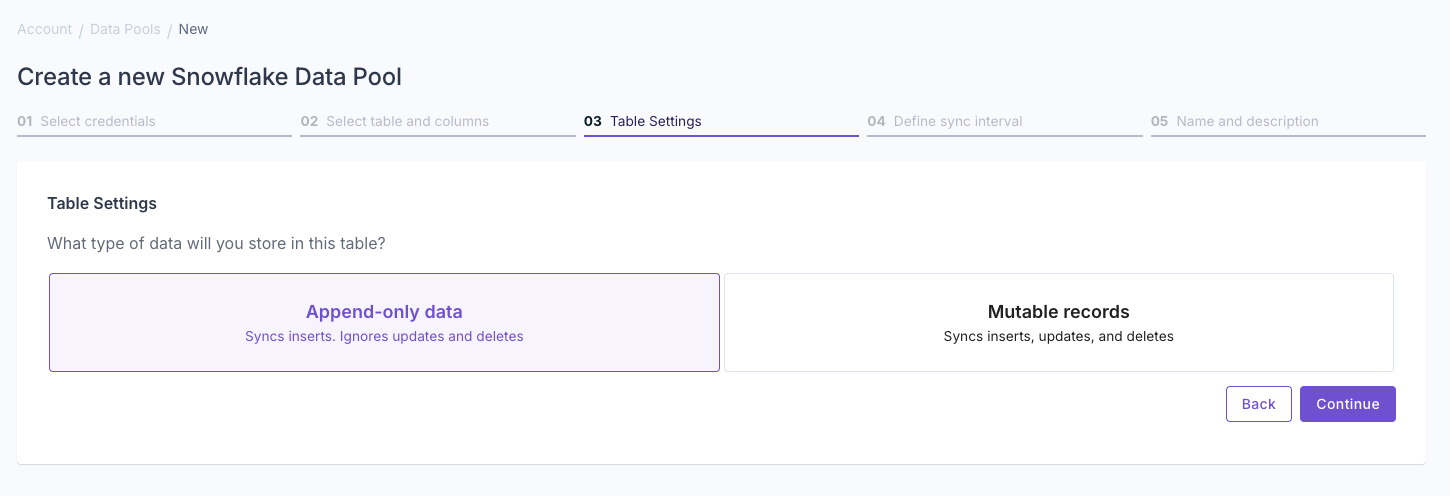
 Select whether your data is "Append-only" or "Mutable data".
To learn more, read out guide on [Selecting table engine and sorting key](/docs/guides/table-engine-and-sorting-key).
Select whether your data is "Append-only" or "Mutable data".
To learn more, read out guide on [Selecting table engine and sorting key](/docs/guides/table-engine-and-sorting-key).
 Answer the questions in the wizard to complete the setup.
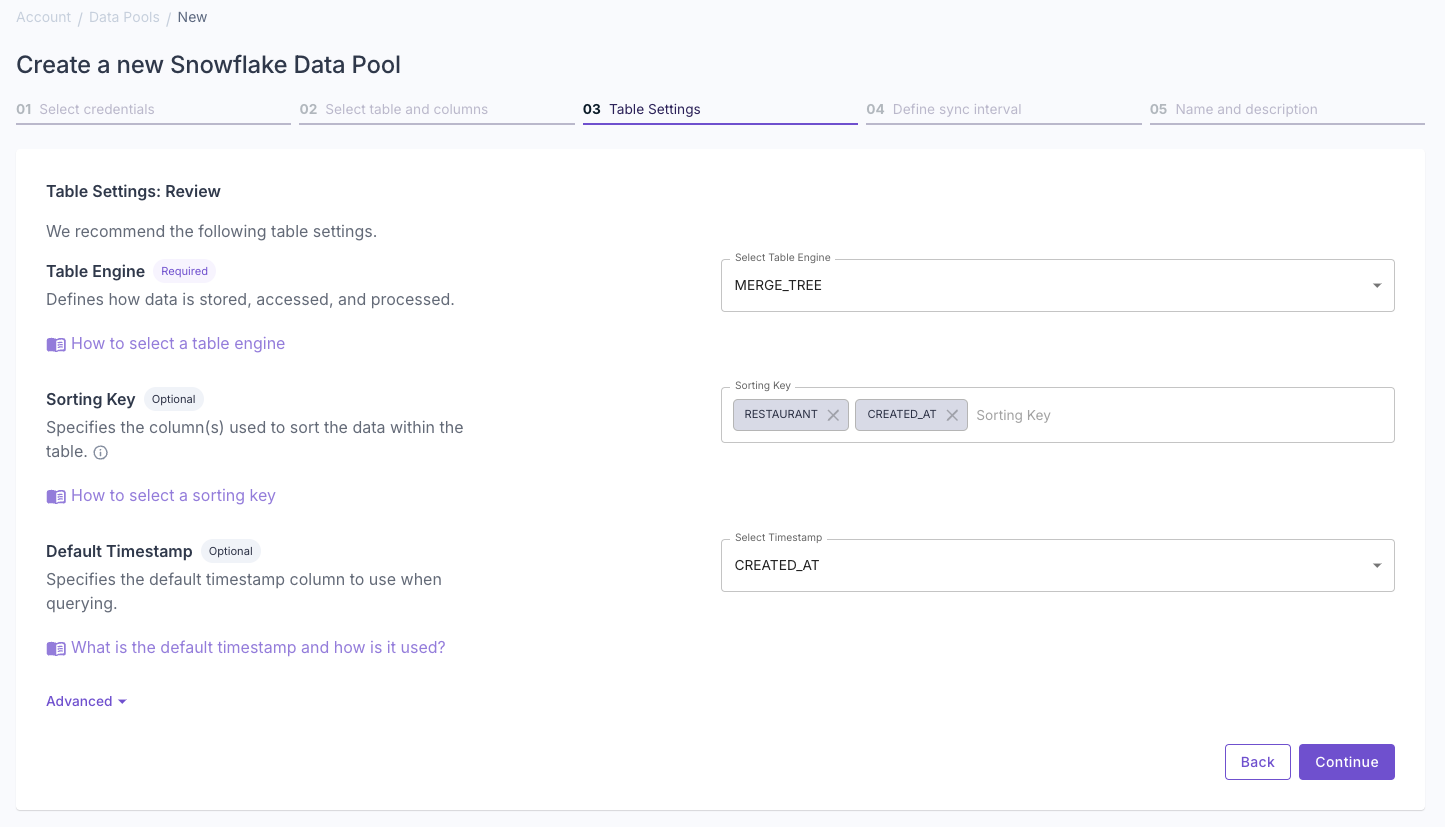
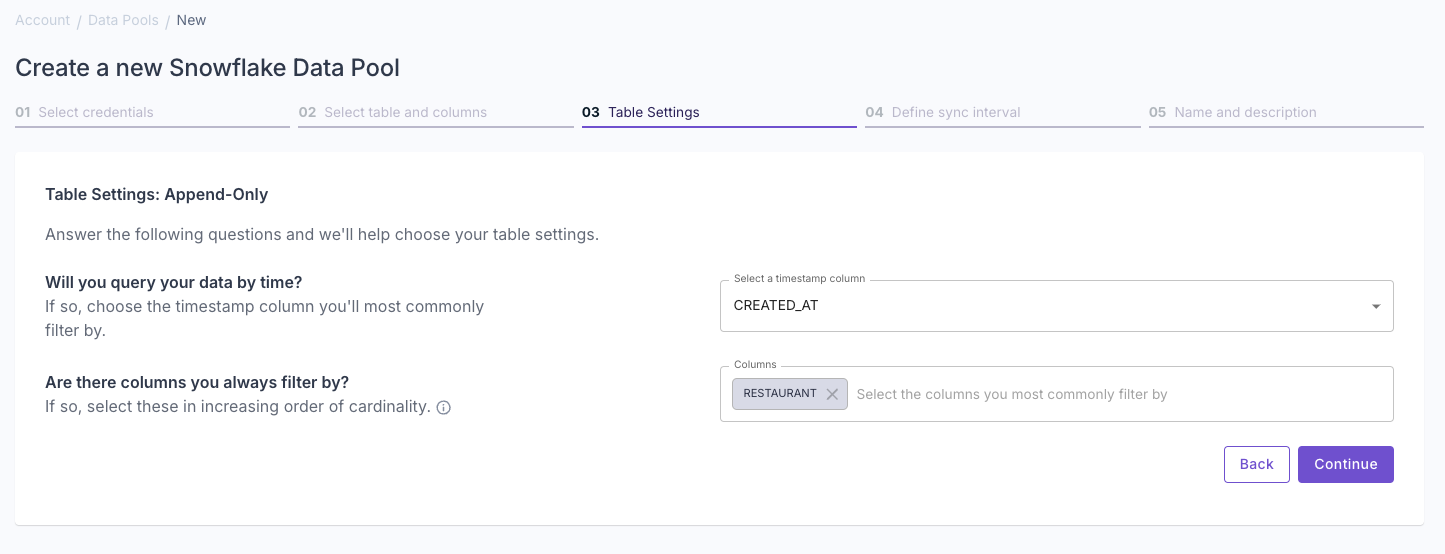 Confirm your table settings and click **“Continue”**.
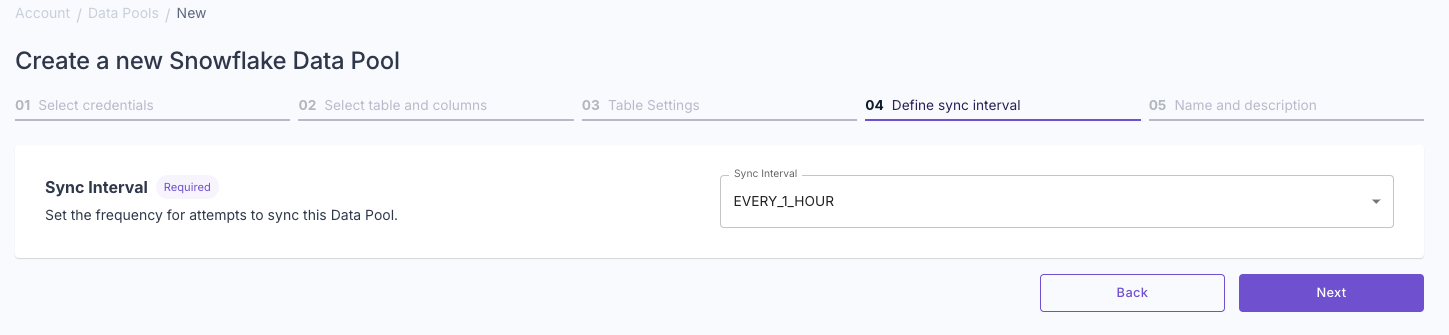
 Specify how often you want Propel to sync your data.
 You can enable [access policies](/docs/access-policies) later to restrict access to the data pool.
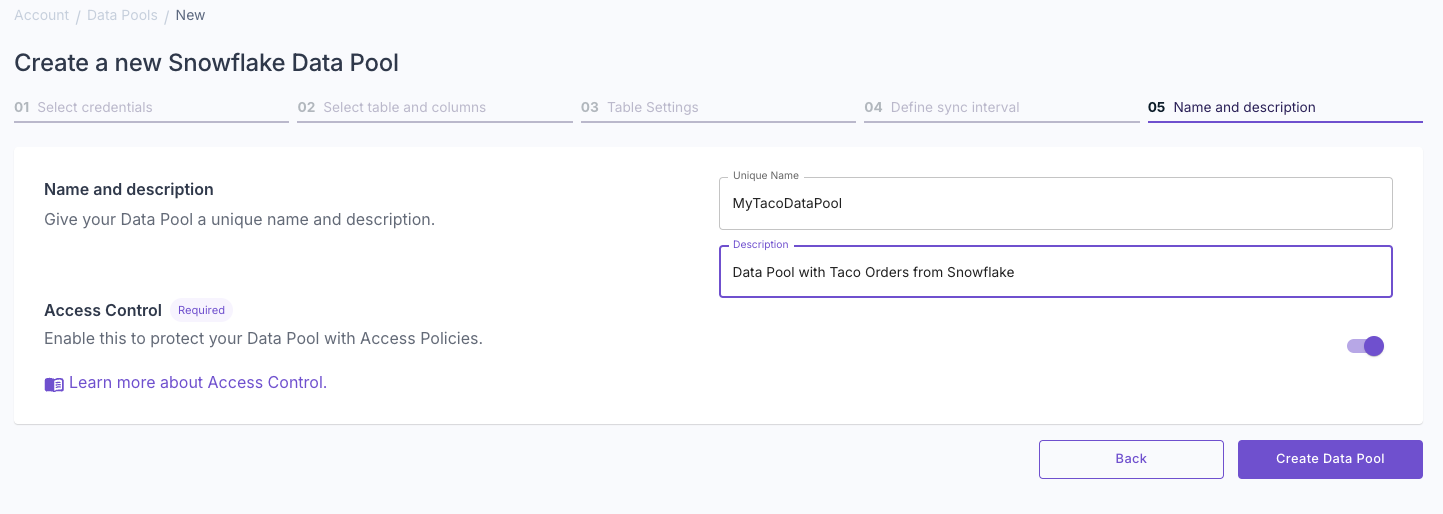 Click **"Create Data Pool"** to complete the setup.
Propel will connect to your Snowflake account, create a stream on the table to capture change data and sync it to Propel.
Click **"Create Data Pool"** to complete the setup.
Propel will connect to your Snowflake account, create a stream on the table to capture change data and sync it to Propel.
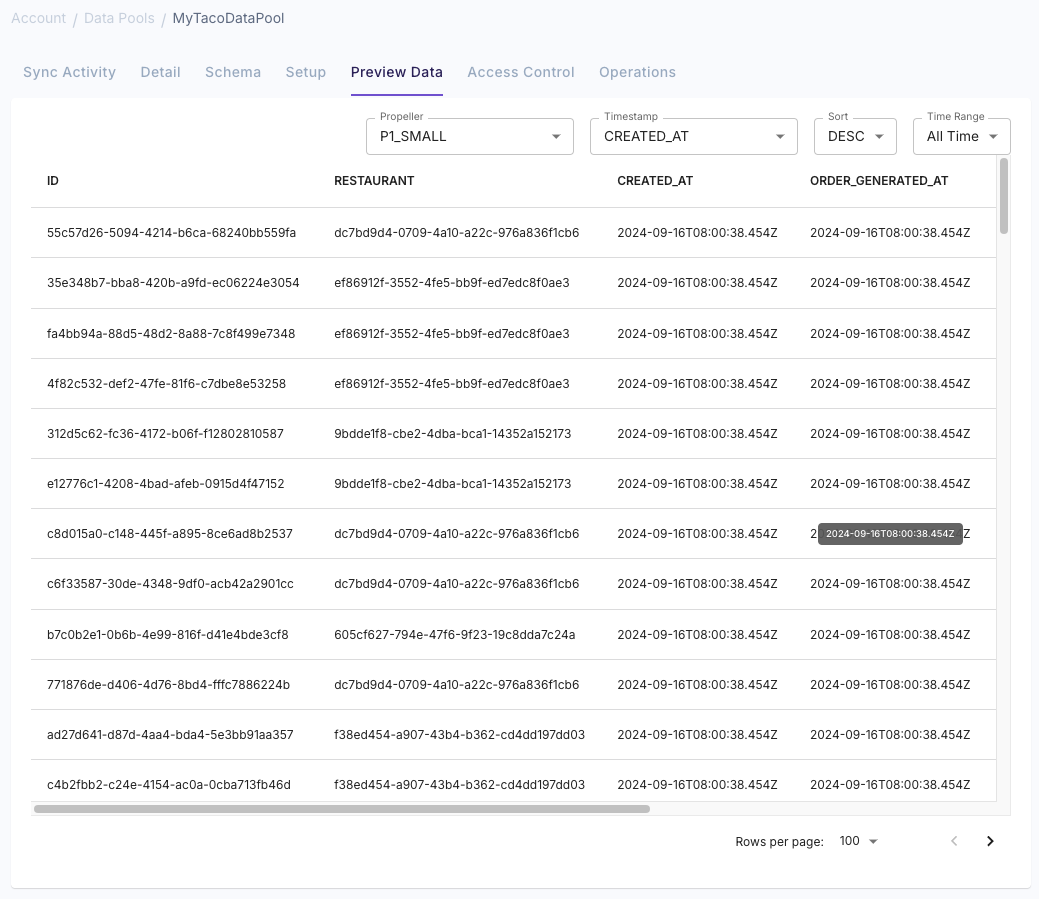
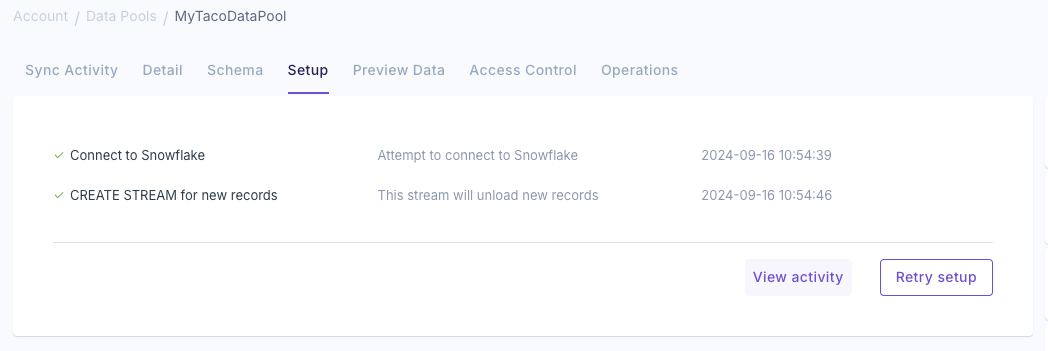 Then you can click **"Preview Data"** to make sure your data is synchronized correctly.
 First, you need to create a Data Source with your Snowflake credentials.
```graphql theme={"system"}
mutation {
createSnowflakeDataSource(input: {
uniqueName: "SnowflakeCredentials"
description: "My Snowflake Credentials"
connectionSettings: {
account: "xy12761.us-east-2.aws"
database: "ANALYTICS"
warehouse: "PROPELLING"
schema: "PUBLIC"
role: "PROPELLER"
username: "PROPEL_USER"
password: ""
}
}) {
...on DataSourceResponse {
dataSource {
id
uniqueName
status
}
}
}
}
```
To create the Data Pool, you need to:
* Take the `id` of the Data Source to create the Data Pool replacing the `` in the example below.
* Provide the name of the table to ingest in the `table` field.
* Specify the columns you want to ingest.
```graphql theme={"system"}
mutation {
createDataPoolV2(
input: {
dataSource: ""
table: "ORDERS"
timestamp: {
columnName: "created_at"
}
uniqueName: "SnowflakeDataPool"
description: "A sample dataset consisting of orders for a taco ordering SaaS"
accessControlEnabled: true
tableSettings: {
engine: {
mergeTree: {
type: MERGE_TREE
}
}
orderBy: ["created_at"]
}
columns: [
{ columnName: "quantity", type: INT32, isNullable: false },
{ columnName: "taco_name", type: STRING, isNullable: false },
{ columnName: "sauce_name", type: STRING, isNullable: false },
{ columnName: "created_at", type: TIMESTAMP, isNullable: false },
{ columnName: "restaurant_id", type: STRING, isNullable: false },
{ columnName: "restaurant_name", type: STRING, isNullable: false },
{ columnName: "taco_total_price", type: FLOAT, isNullable: false },
{ columnName: "order_item_id", type: STRING, isNullable: false },
{ columnName: "tortilla_id", type: STRING, isNullable: false },
{ columnName: "toppings", type: JSON, isNullable: false },
{ columnName: "sauce_id", type: STRING, isNullable: false },
{ columnName: "taco_unit_price", type: FLOAT, isNullable: false }
]
}
) {
dataPool {
id
uniqueName
description
columns {
nodes {
columnName
clickHouseType
isNullable
}
}
}
}
}
```
```hcl theme={"system"}
resource "propel_data_source" "my_snowflake" {
unique_name = "SnowflakeCredentials"
description = "My Snowflake Credentials"
type = "SNOWFLAKE"
snowflake_connection_settings {
account = "xy12761.us-east-2.aws"
database = "ANALYTICS"
warehouse = "PROPELLING"
schema = "PUBLIC"
role = "PROPELLER"
username = "PROPEL_USER"
password = var.snowflake_password
}
}
variable "snowflake_password" {
type = string
sensitive = true
}
resource "propel_data_pool" "snowflake_data_pool" {
unique_name = "SnowflakeDataPool"
description = "A sample dataset consisting of orders for a taco ordering SaaS"
data_source = propel_data_source.my_snowflake.id
table = "ORDERS"
timestamp = "created_at"
access_control_enabled = true
table_settings {
engine {
type = "MERGE_TREE"
}
order_by = ["timestamp"]
}
column {
name = "quantity"
type = "INT32"
nullable = false
}
column {
name = "taco_name"
type = "STRING"
nullable = false
}
column {
name = "sauce_name"
type = "STRING"
nullable = false
}
column {
name = "restaurant_id"
type = "STRING"
nullable = false
}
column {
name = "restaurant_name"
type = "STRING"
nullable = false
}
column {
name = "taco_total_price"
type = "FLOAT"
nullable = false
}
column {
name = "order_item_id"
type = "STRING"
nullable = false
}
column {
name = "tortilla_id"
type = "STRING"
nullable = false
}
column {
name = "toppings"
type = "JSON"
nullable = false
}
column {
name = "sauce_id"
type = "STRING"
nullable = false
}
column {
name = "taco_unit_price"
type = "FLOAT"
nullable = false
}
column {
name = "order_id"
type = "STRING"
nullable = false
}
column {
name = "order_item_generated_at"
type = "TIMESTAMP"
nullable = false
}
column {
name = "taco_id"
type = "STRING"
nullable = false
}
column {
name = "timestamp"
type = "TIMESTAMP"
nullable = false
}
column {
name = "tortilla_name"
type = "STRING"
nullable = false
}
}
```
***
First, you need to create a Data Source with your Snowflake credentials.
```graphql theme={"system"}
mutation {
createSnowflakeDataSource(input: {
uniqueName: "SnowflakeCredentials"
description: "My Snowflake Credentials"
connectionSettings: {
account: "xy12761.us-east-2.aws"
database: "ANALYTICS"
warehouse: "PROPELLING"
schema: "PUBLIC"
role: "PROPELLER"
username: "PROPEL_USER"
password: ""
}
}) {
...on DataSourceResponse {
dataSource {
id
uniqueName
status
}
}
}
}
```
To create the Data Pool, you need to:
* Take the `id` of the Data Source to create the Data Pool replacing the `` in the example below.
* Provide the name of the table to ingest in the `table` field.
* Specify the columns you want to ingest.
```graphql theme={"system"}
mutation {
createDataPoolV2(
input: {
dataSource: ""
table: "ORDERS"
timestamp: {
columnName: "created_at"
}
uniqueName: "SnowflakeDataPool"
description: "A sample dataset consisting of orders for a taco ordering SaaS"
accessControlEnabled: true
tableSettings: {
engine: {
mergeTree: {
type: MERGE_TREE
}
}
orderBy: ["created_at"]
}
columns: [
{ columnName: "quantity", type: INT32, isNullable: false },
{ columnName: "taco_name", type: STRING, isNullable: false },
{ columnName: "sauce_name", type: STRING, isNullable: false },
{ columnName: "created_at", type: TIMESTAMP, isNullable: false },
{ columnName: "restaurant_id", type: STRING, isNullable: false },
{ columnName: "restaurant_name", type: STRING, isNullable: false },
{ columnName: "taco_total_price", type: FLOAT, isNullable: false },
{ columnName: "order_item_id", type: STRING, isNullable: false },
{ columnName: "tortilla_id", type: STRING, isNullable: false },
{ columnName: "toppings", type: JSON, isNullable: false },
{ columnName: "sauce_id", type: STRING, isNullable: false },
{ columnName: "taco_unit_price", type: FLOAT, isNullable: false }
]
}
) {
dataPool {
id
uniqueName
description
columns {
nodes {
columnName
clickHouseType
isNullable
}
}
}
}
}
```
```hcl theme={"system"}
resource "propel_data_source" "my_snowflake" {
unique_name = "SnowflakeCredentials"
description = "My Snowflake Credentials"
type = "SNOWFLAKE"
snowflake_connection_settings {
account = "xy12761.us-east-2.aws"
database = "ANALYTICS"
warehouse = "PROPELLING"
schema = "PUBLIC"
role = "PROPELLER"
username = "PROPEL_USER"
password = var.snowflake_password
}
}
variable "snowflake_password" {
type = string
sensitive = true
}
resource "propel_data_pool" "snowflake_data_pool" {
unique_name = "SnowflakeDataPool"
description = "A sample dataset consisting of orders for a taco ordering SaaS"
data_source = propel_data_source.my_snowflake.id
table = "ORDERS"
timestamp = "created_at"
access_control_enabled = true
table_settings {
engine {
type = "MERGE_TREE"
}
order_by = ["timestamp"]
}
column {
name = "quantity"
type = "INT32"
nullable = false
}
column {
name = "taco_name"
type = "STRING"
nullable = false
}
column {
name = "sauce_name"
type = "STRING"
nullable = false
}
column {
name = "restaurant_id"
type = "STRING"
nullable = false
}
column {
name = "restaurant_name"
type = "STRING"
nullable = false
}
column {
name = "taco_total_price"
type = "FLOAT"
nullable = false
}
column {
name = "order_item_id"
type = "STRING"
nullable = false
}
column {
name = "tortilla_id"
type = "STRING"
nullable = false
}
column {
name = "toppings"
type = "JSON"
nullable = false
}
column {
name = "sauce_id"
type = "STRING"
nullable = false
}
column {
name = "taco_unit_price"
type = "FLOAT"
nullable = false
}
column {
name = "order_id"
type = "STRING"
nullable = false
}
column {
name = "order_item_generated_at"
type = "TIMESTAMP"
nullable = false
}
column {
name = "taco_id"
type = "STRING"
nullable = false
}
column {
name = "timestamp"
type = "TIMESTAMP"
nullable = false
}
column {
name = "tortilla_name"
type = "STRING"
nullable = false
}
}
```
***